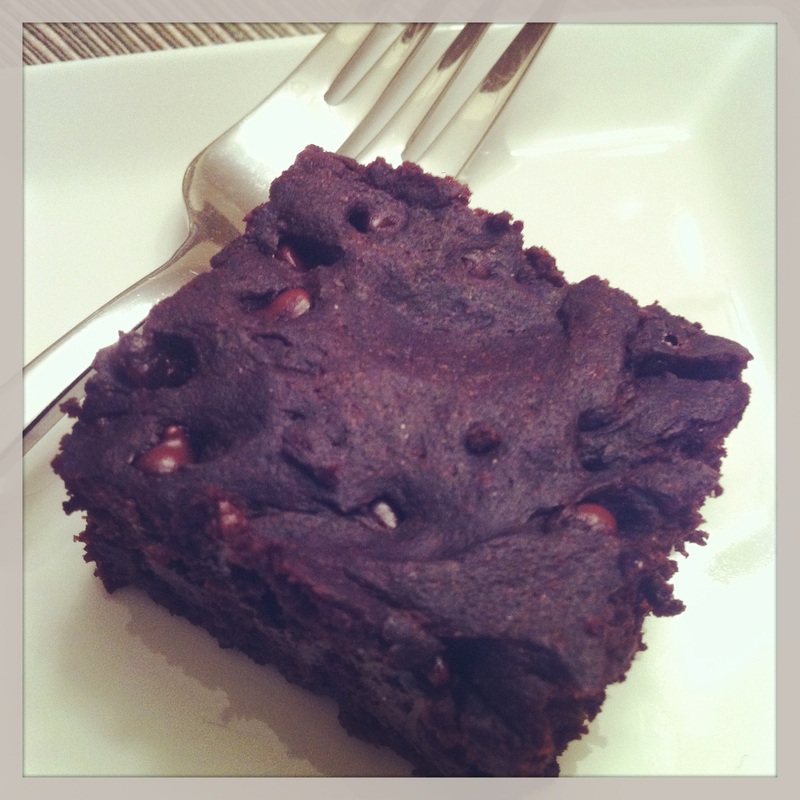
Ahhh there is nothing better than brownies on a Sunday night, especially for being restricted to normal brownies. Since my family has gone gluten free, my brother and I decided to make a dessert that we all could enjoy like we used to. I came across this recipe in my new favorite cookbook The Healthy Gluten-Free Lifestyle and decided I had to make it because the picture looked amazing. These fudgey brownies are the best brownies I have ever tasted...seriously! The taste is almost an exact replica of real brownies, and you cant even tell that there is no gluten, dairy or eggs in them! The chocolate chips provide an amazing oozing chocolatey texture to every single bite, adding to the already rich flavor. Nutritional Information: For one brownie 153.2 calories, 1.9g protein, 4.9g sugar, 9.5g fat This recipe was adapted from The Healthy Gluten-Lifestyle cookbook. Ingredients: - 1/3 cup non-dairy butter (I used Smart Balance)
- 1/3 cup Coconut Oil
- 2 tsp Vanilla
- 3/4 cup baking sweetener (I used a little less than 3/4 cup and added some brown sugar)
- 1/3 cup Sorghum Flour
- 1/5 cup Teff Flour
- 1/4 cup Potato Starch
- 1/3 cup Tapioca Flour
- 1/2 cup Unsweetened Cocoa Powder
- 1 tsp Xanthan Gum
- 1/2 tsp Baking Soda
- 1/2 tsp Salt
- 1 cup Water
- 2/3 cup Dairy-Free Chocolate Chips (I used Enjoy Life Mini Semi-Sweet Chocolate Chips) **optional
| Baking Instructions - Preheat oven to 350F
- Combine non-dairy butter, oil, vanilla and baking sweetener into a mixer. Mix together until creamy
- Add the flours (starches), baking soda and salt one at a time alternating with 1 cup of water. Mix together until fully combined.
- Add in chocolate chips and mix by hand.
- Pour into greased baking pan. I used a 5x9 pan
- Bake for 25 minutes
Makes 15 brownies |
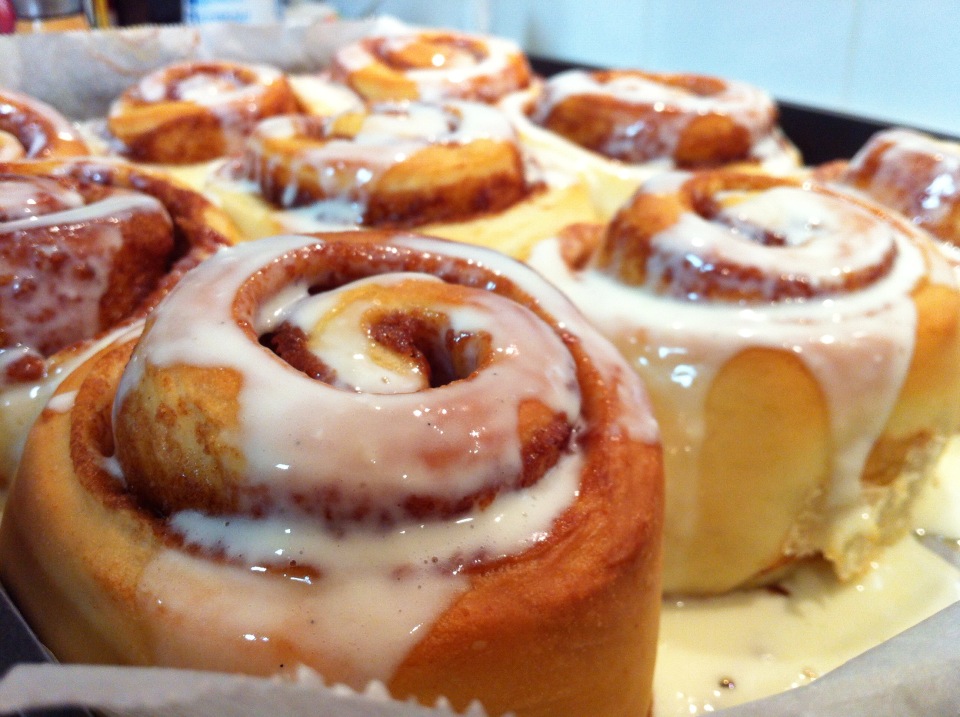
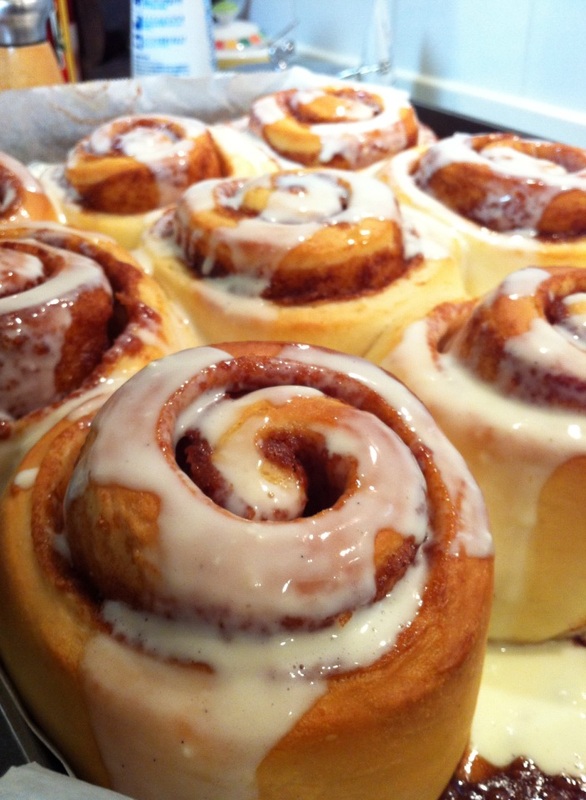
DANGEROUSLY GOOD. Far-out. I've wanted to make these for SUCH a long time....
Generally, it's not good to be an impatient baker. Having some patience is key and I am slightly lacking in that department! EVERYTHING TASTES TOO GOOD, and this impatience of mine tends to effect the final creation. Bad, bad, bad. So, these cinnamon rolls have been on my list for a while. It's the rising times that always turn me off the idea (but of course onto another :P)
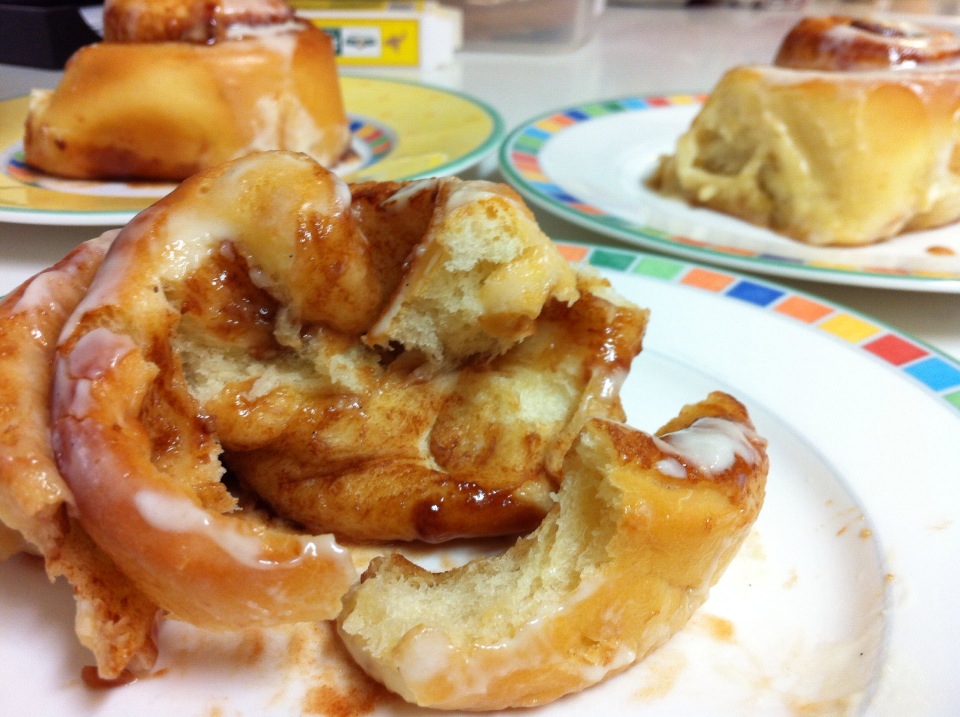
TODAY, however, is the day I dedicated to doing a thorough job in creating probably one of the best tasting things on earth. Cinnamon, sugar, pillowy dough, and an oozing cream cheese glaze.... just wow. Gooey. Some things just get along too well.
The nice thing about working with bread dough rather than cookie dough or even cake batters is that you can't really pick at it along the way. It only really tastes amazing when it is freshly baked and eaten warm. Batters and cookie dough....well, often only half of it finds it's way into the oven.
MOVING ON.
These did require around 4 hours waiting time in total, but honestly, so worth it in the end. All you need to do is find something to keep you occupied in the meantime. The amount of homework we get makes this easy for me to do... not that I actually did do homework. I sat and watched the dough rise.
Nah, I didn't do that either.
HAVE a go; it's extremely rewarding in the end. But, BE PATIENT with it. :)
Ingredients: For the DOUGH- 3/4 c warm water
- 2 1/4 tsp active dry yeast (instant kind)
- 1/2 c light brown sugar
- 1 tsp salt
- 1/4 c buttermilk
- 1 egg
- 1/3 c canola oil
- 4 1/2-5 cups plain flour
For the FILLING- 1/2 c butter, room temp.
- 1 1/4 c light brown sugar
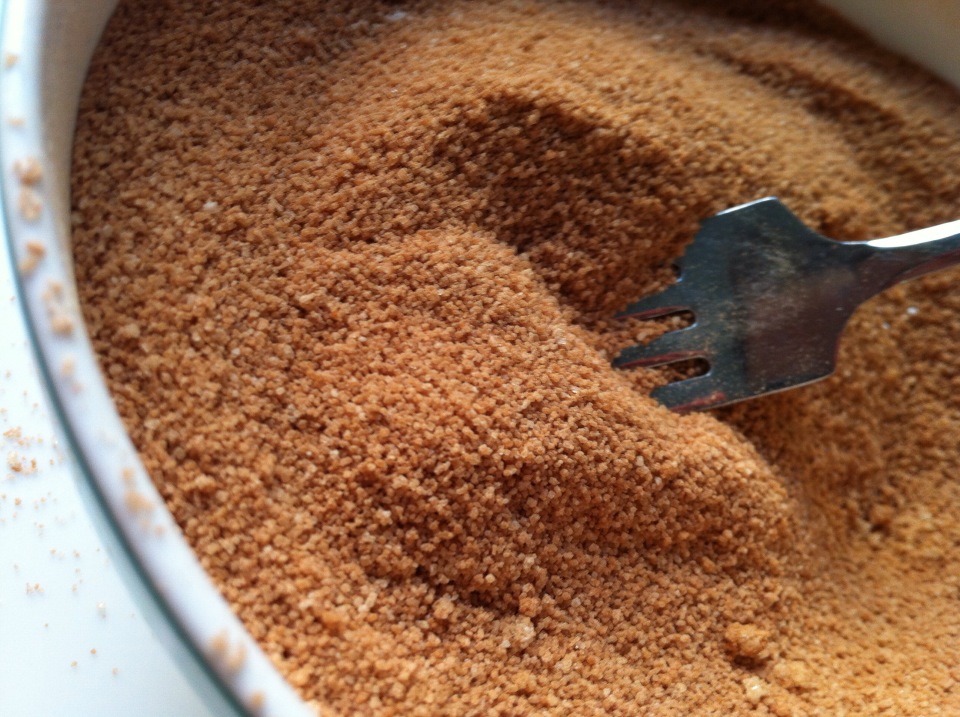
- 2 1/2 tbsp ground cinnamon
- 2 tbsp cornstarch
For the GLAZE- 4 tbsp cream cheese, room temperature
- 1/4 c butter, room temp.
- 1 tsp vanilla bean paste/ extract
- 1 tsp fresh lemon juice
- 1 1/4 c icing sugar (powdered)
| | Directions:
- In a medium bowl, stir in the water, yeast and 1 tbsp of the brown sugar. Let stand for 5 minutes until the mixture looks frothy. Pour in the remaining sugar and the salt and stir for a further 15-20 seconds.
- In a small bowl, measure buttermilk, oil and the egg and whisk until all ingredients are incorporated. Pour this mixture into the water and yeast mixture and stir for another 20 seconds.
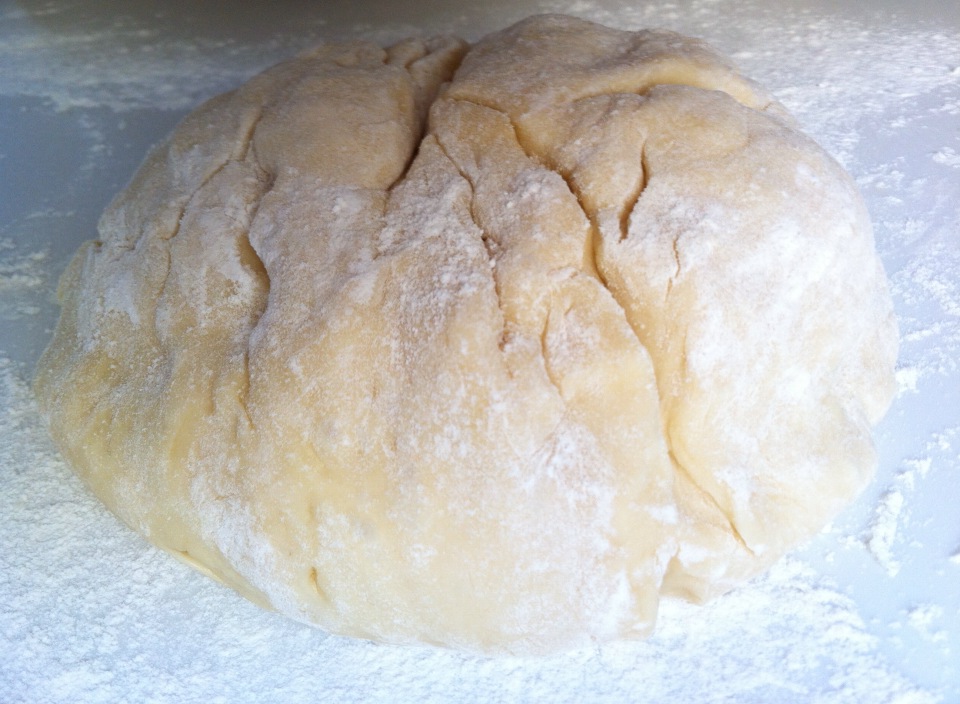
- Pour 2 cups of flour into the mixture and stir until incorporated. Add 1/4 cup at a time until dough pulls away from the bowl and doesn't stick to your hands when touched. Don't go any further when you reach this point.
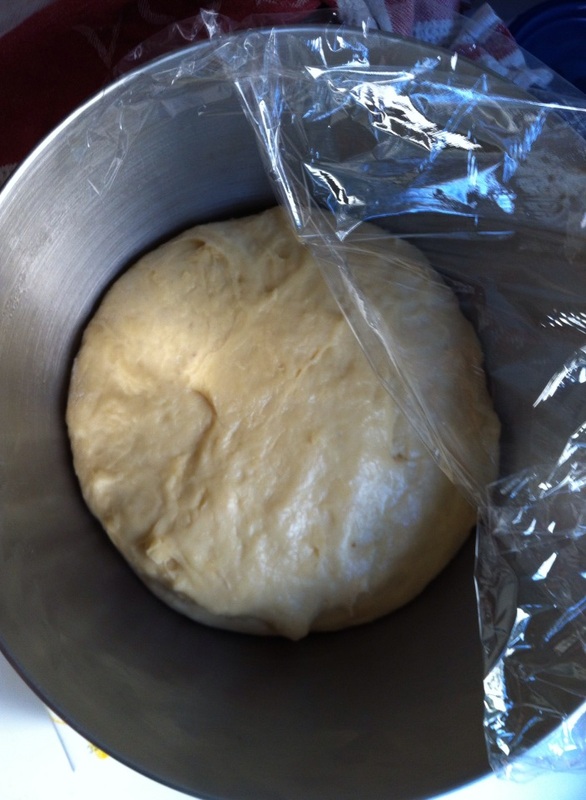
- At this point, knead the dough for 5 minutes, then remove it from the bowl, grease the bowl with some oil and put the dough back. Cover with a cloth and let rise for 1-2 hours, until it has doubled in size.
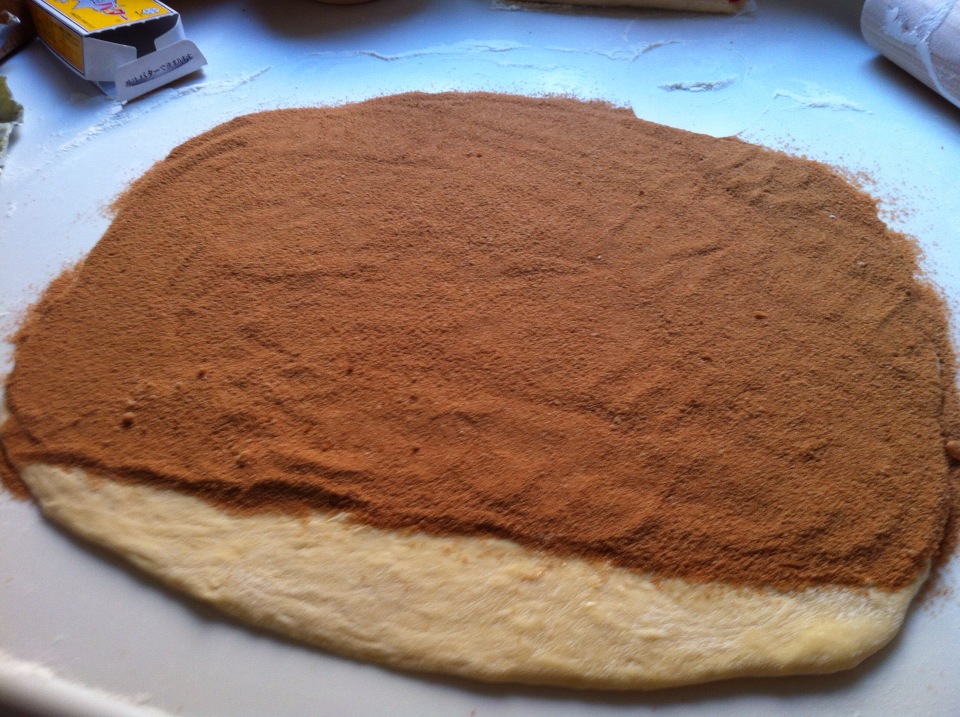
- In a medium sized bowl, stir the brown sugar, cinnamon and cornstarch together until combined. Set aside and grab your dough. Knead it for another minute. Flour a clean, dry surface and lightly coat the dough with flour too. Roll out the dough to be about 20X30 rectangle, as close as you can. Make sure the dough isn't sticking to the surface.
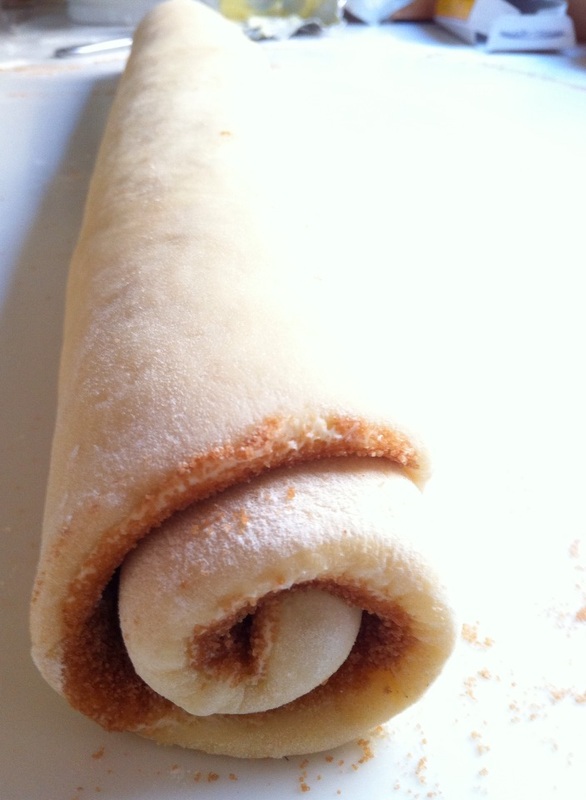
- Spread the dough with butter getting right to the edges but making sure to leave an inch of dough bare on one of the lengths of the rolled out dough. Then, dump the sugar and cinnamon mixture on top of the butter and spread with your hand to all edges. Roll the cinnamon-sugar into the dough once spread.
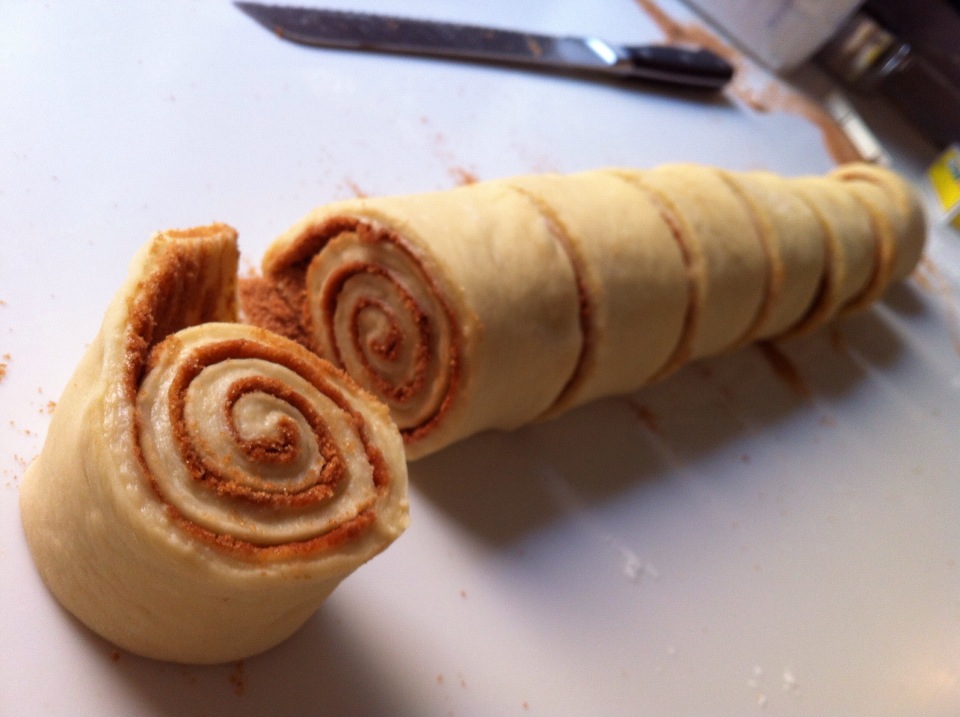
- Roll the dough from the opposite side of the bare strip into a tight roll until lip of untouched dough is underneath. The, cut 2 inch segments using a serrated knife edge, a bread knife, to avoid squashing roll structure. Also, cut the edges to make even edges.
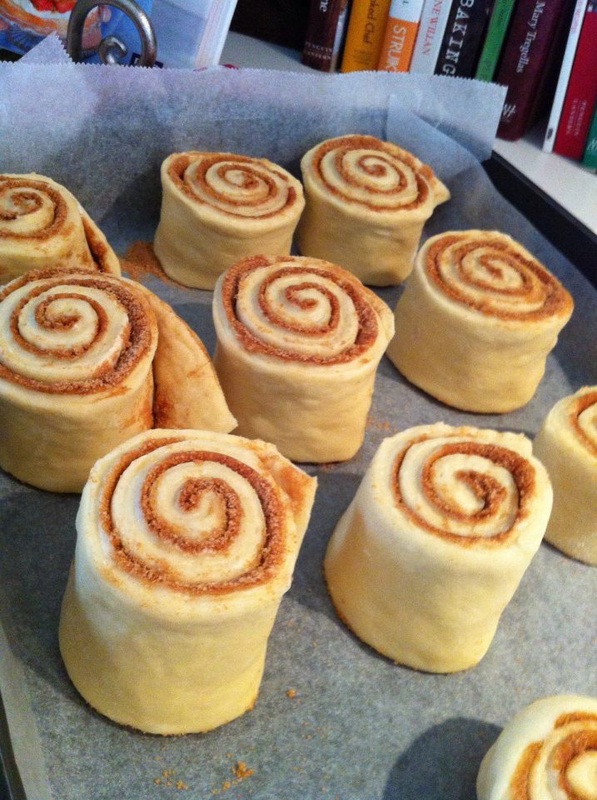
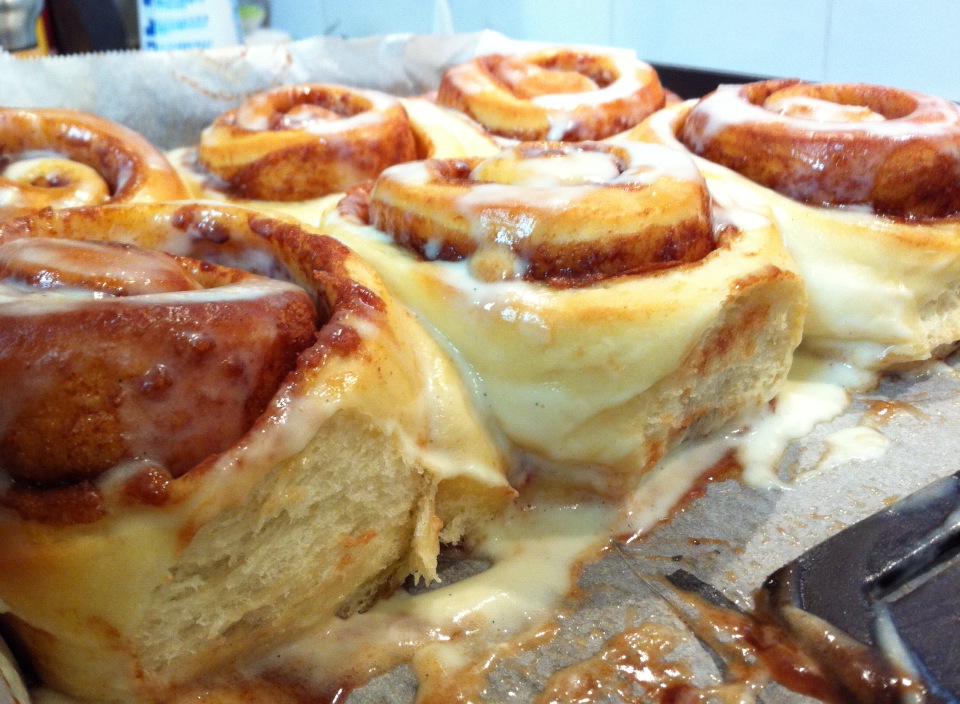
- Line a baking dish similar to one pictured below with baking paper and place each roll swirl side up about half an inch apart, cover with plastic wrap and then a cloth and set aside to rise for a further 1-2 hours. They should touch once risen completely.
- Preheat your oven to 350 degrees fahrenheit---170 celsius---160 celsius fan-forced. If you have a yield of 9, bake for around 25-30 minutes, with a yield of 12, bake for about 20-25 minutes. Keep an eye on them! They should have become a golden brown in colour.
- Meanwhile, whip the butter and cream cheese together, then add the vanilla and lemon juice. Scrape down the sides of the bowl and add the sugar. Mix well again. Add milk if you'd like a runnier consistency. Once the rolls are out of the oven, pour half the glaze over the top and wait around 5 minutes until pouring on the rest.
THESE ARE AWESOME SERVED WARM, but of course anytime, any day, any way...they're still great. Use a serrated knife (bread knife) to cut the 2-inch segments. You want to avoid squashing the roll. | Before rising time | After rising time and in the oven! | So gooey, so so gooey.
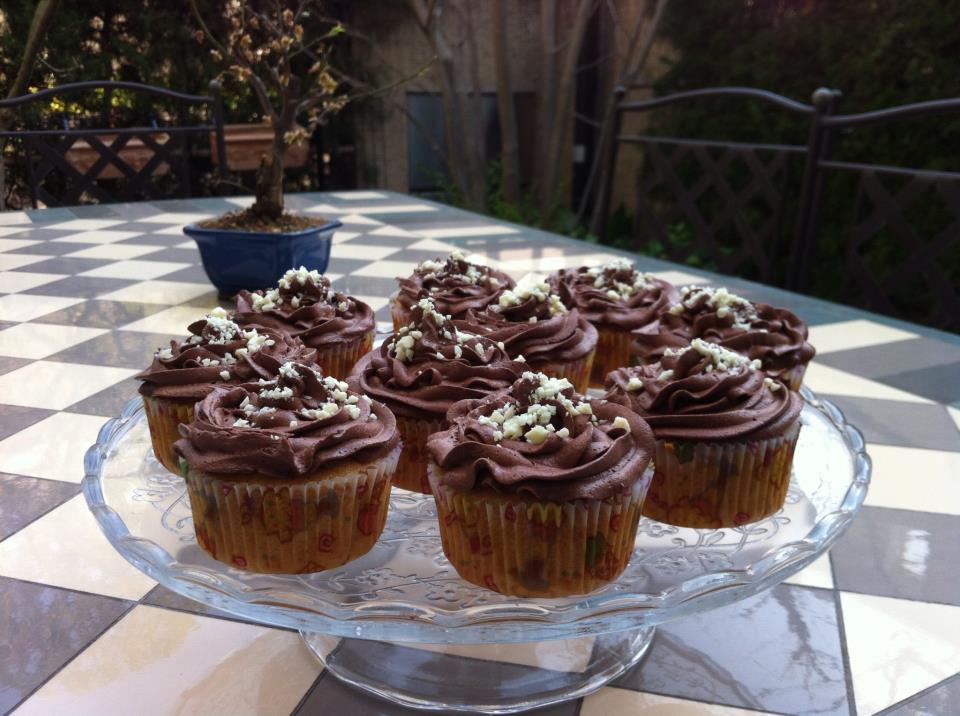
Dinner party at my house tonight. Yay, food.
We have a bunch of kids coming around which calls for some entertaining. My first thought was to keep them occupied with something sweet. And then these came into existence... although adding to the sugar rush kids that seem to have with them all day wasn't the smartest idea.
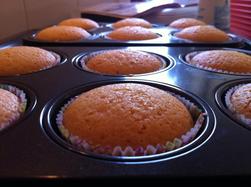
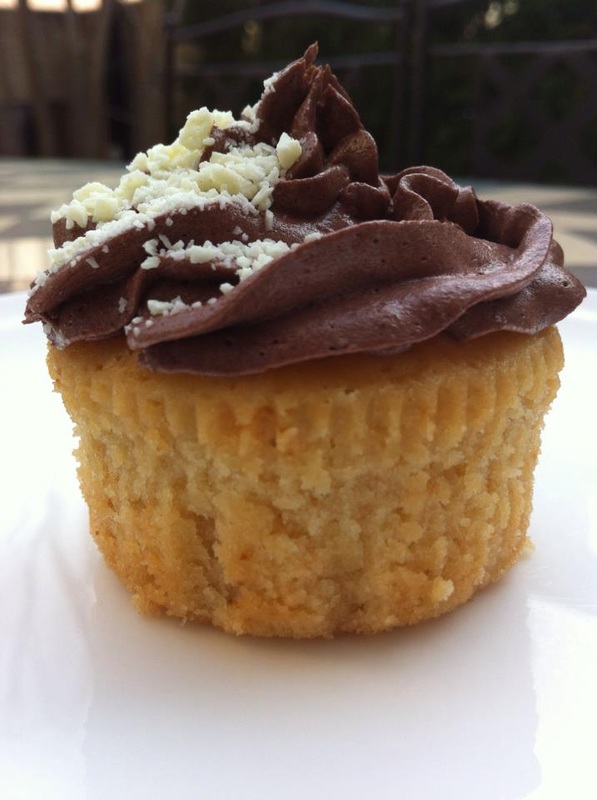
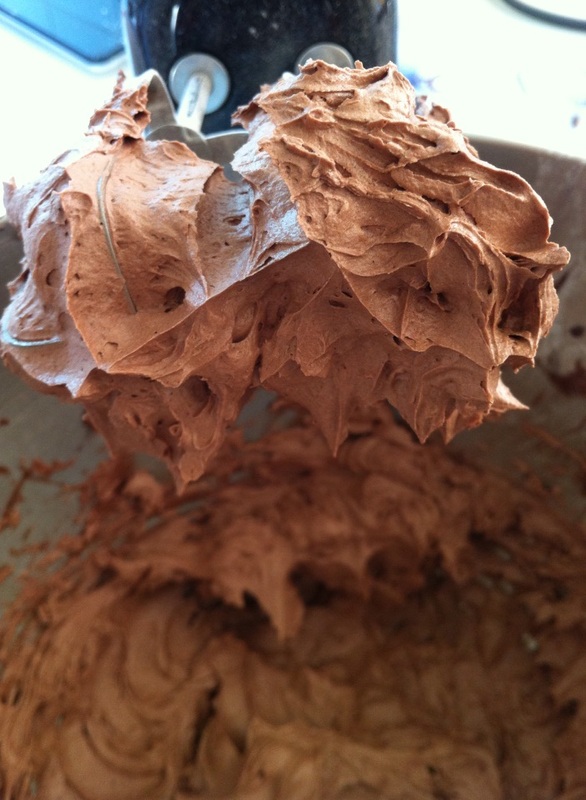
This is a moist, caramel mud-cake topped with a light chocolate buttercream that is perfect for some piping fun, too. I sprinkled the the top with crumbled white chocolate, just because it seemed fitting. These are SUPER addicting and every bite is as satisfyingly moist and decadent as the one before! AND, they're actually very simple and quick little cakes to bake. The frosting is so light that it tops the denser cake underneath quite nicely.
I love mudcake...
Ingredients:For the CAKE - 125g butter, chopped
- 100g white eating chocolate, chopped coarsely
- 150g firmly packed brown sugar
- 90g golden syrup
- 160ml milk
- 150g plain flour
- 50g self-raising flour
- 1 egg
Directions:- Preheat oven to 140 degrees c fan forced (160 degrees c) and line a 12-hole muffin pan with cases.
- Combine the butter, chocolate, sugar, syrup and milk in a bowl and heat the bowl over a pot of boiling water. (water doesn't touch bottom of bowl). Stir until smooth and all melted and then transfer mixture to a medium bowl to cool (15 minutes or so)
- Whisk sifted flours and then the egg into the cooled chocolate mixture and then divide among cases (3/4 full- or a little more!)
- Bake for 30-40 minutes depending on how full the cases are. (The more full, the more time in they need in the oven). Stick a skewer/knife in the middle of the cakes. If it comes out clean, they're done.
- Turn cakes, top side up, onto wire rack to cool.
| For the BUTTERCREAM - 1 c unsalted butter
- 3 1/2 c icing sugar (powdered sugar)
- 1/2 c cocoa powder
- 1/2 tsp salt
- 2 tsp vanilla extract
- 4 tbsp milk, or heavy cream
Directions:- With a beater, cream the butter for a few minutes on medium speed.
- Turn off the mixer and add 3 cups of powdered sugar and the cocoa. Mix on lowest speed until everything is combined.
- Add vanilla, salt, and milk/cream and beat on medium speed for another 3 minutes.
- Depending on consistency, add more milk to thin it out, and add more sugar to thicken it
 Out the oven- so uniform!
Adapted from:The Australian Women's Weekly CUPCAKES AND COOKIES
|
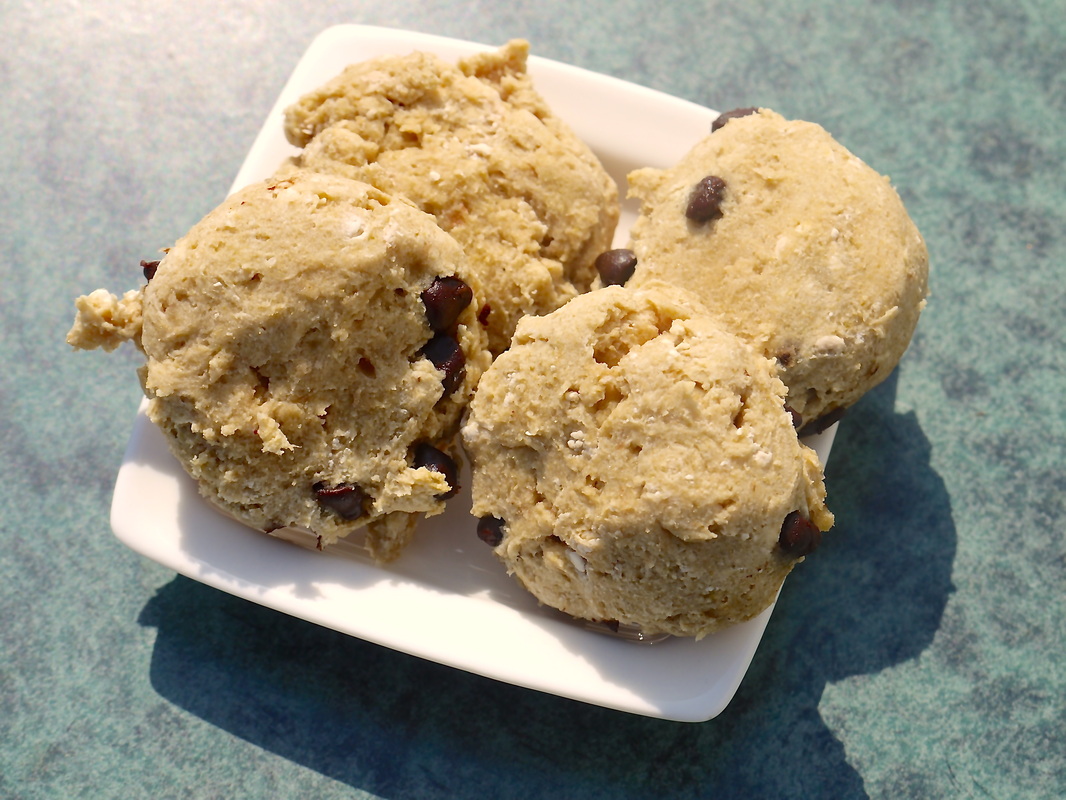
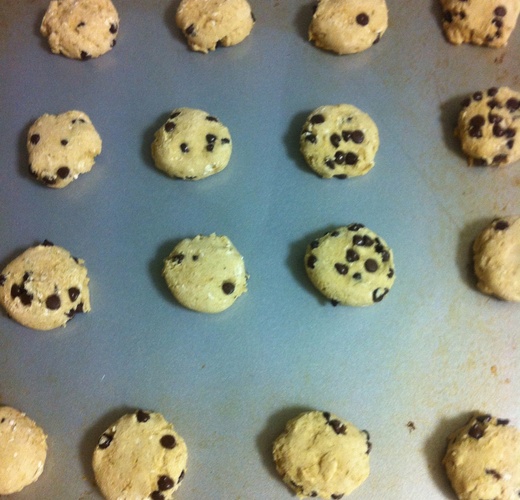
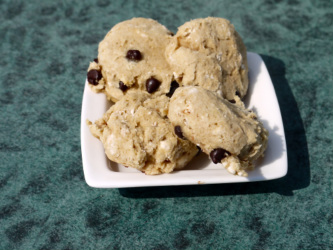
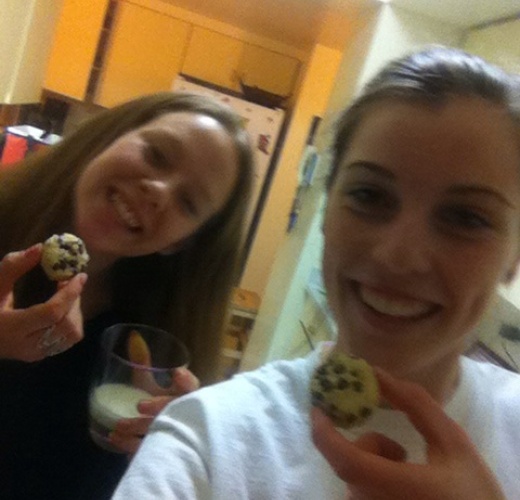
Okay, first of all, don't read the title and immediately think "gross". These cookies actually weren't that bad! Although they lacked the authentic chocolate chip cookie flavor, these came pretty darn close. My friend Nicole and I were both craving chocolate chip cookies yesterday and we decided that there was no better way to spend a Friday night than baking cookies and playing a little Just Dance on the wii--dont judge. (: Since Nicole doesn't eat processed sugar (aka. desserts and other sugary foods) we had to find a recipe that would suit both of our needs. We came across a cookie recipe on Pinterest which led us to the fantastic blog Sift, Stir & Savour. (We adapted the recipe a little) Erin's recipe called for almond butter, coconut sugar and erythritol ( or any sugar substitute) . However, Nicole and I decided not to use the almond butter and instead of the coconut sugar and erythritol we used Splenda Baking Sweetener. I have never made these cookies before, so I wouldn't know what the difference is between adding almond butter and leaving it out. But, when we tasted these cookies they had a very mellow flavor so I'm thinking the almond butter would have been good to add. Oh well, there is always a next time! (: After making this recipe, Nicole and I decided to create a snap guide so you can check it out here! Ingredients: - 1 cup brown rice flour
- 1/4 cup tapioca starch (flour)
- 1/4 cup potato starch
- 1 tsp xanthan gum
- 1/2 tsp baking soda
- 1/4 tsp salt
- 1/3 cup applesauce
- 1/4 cup baking sweetener
- 2 tsp vanilla
- 1/4 cup almond milk
- 3/4 cup dairy free chocolate chips
Optional: 1/3 cup almond butter Makes 20, 1/2 in cookies | Directions: - Preheat oven to 350F
- Combine all the flours, salt and baking soda in a small bowl and set aside.
- In a mixer (or another bowl) combine the applesauce, baking sweetener, vanilla and almond milk. Mix until fully combined.
- Add the flour to the mixer and mix until all the ingredients are combined and you have a dough!
- Add in the chocolate chips and mix by hand.
- Spoon onto cookie sheet and press down on the cookies because they do not spread out when they bake.
- Bake for 8 minutes
| ^^ A little blurry, but we enjoyed the cookies :)
Hey! So recently I have been craving ice cream. I don't know why though--maybe its the fact that I can't have dairy anymore and I have just been thinking about all the things I cant have anymore. Since chocolate and banans go so well together, I thought it would be a good idea to combine them in some form of delicious ice cream (: This ice cream is super creamy and the banana adds a really good flavor and texture. I recommend using ripe bananas (the ones that are practically brown) instead of yellow ones because it creates a different flavor--the un-ripe banana kind. Anyways... I found this recipe online today at bay area bites and decided to try it out with my friend Raquel! When Raquel and I made the ice cream we let it mix in the ice cream maker for an extra 10 minutes to make it more creamy because mixing it for just 20 minutes didn't seem long enough.
Ps! Feel free to add any toppings! Raquel added oreos and I added almond butter. But hey, don't feel limited! The sky is the limit! - Raquel Ingredients: - 2 1/2 ripe bananas
- 1 1/2 cup almond milk (original/unsweetened)
- 2 tablespoons cocoa powder
- 2 tablespoons sugar
| Directions: - Mix 1/2 cup almond milk with the cocoa powder and sugar and whisk until combined
- Microwave mixture for 40 seconds and then whisk together again
- In a blender, combine the other 1 cup of almond milk and the 2 1/2 bananas. Mix it together for around 10-15 seconds just to make a puree
- Add the banana puree, and chocolate mix into an ice cream mixture. Let it process for 20-30 minutes--depending on how creamy you want the ice cream.
- Once the ice cream is done churning dish it up and dig in!
This can be stored in a freezable container (: Makes about 8 servings |
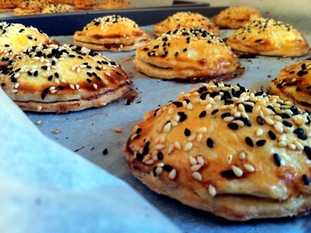
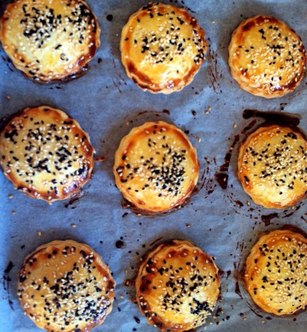
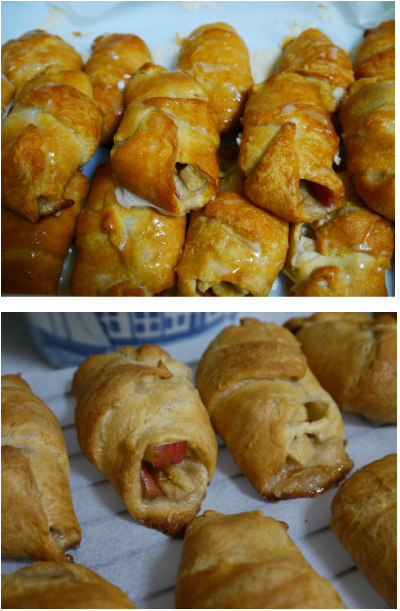
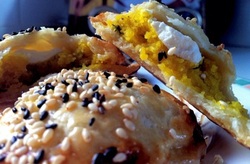 Caera here. Hey guys. :) So, it's been a pretty hectic week and I don't think i'm the only one who is glad that the weekend is finally here! YAY. It is sad though, that today is almost done. But, I can't say that I spent it badly! I made.... <---THESE, and they tasted awesome! This was the second time that my oven has produced these crispy, flaky pockets stuffed with moist sweet pumpkin and warm tangy goats cheese, and they've been successful both times. Straight down the hatch they went as soon as they'd hit my family's plates. Developed from K.abc
| Ingredients:
Pastry:
- 1 cup plain white flour (but I like using spelt flour)
- 1/2 cup butter, chilled
- 2 tbsp cool water
- 1/2 tsp sea salt
Filling:
- 1/4 wedge of small pumpkin, skinned and chopped into cubes
- 1/4 cup soft goats cheese
- 1-2 tbsp olive oil
- 1-2 tbsp thyme, fresh
- 3 tbsp shallot, chopped
- 1 large clove garlic, minced
- 1 tsp nutmeg (to taste)
- 1 tsp cinnamon (to taste)
- 1 knob of butter
- 1 tsp brown sugar, coarse (to taste)
- Salt and Pepper (to taste)
For the topping:
- 1 egg, beaten
- black and/or white sesame seeds
| Directions:
Dough Preparation: Needs minimum 30 mins in the fridge
1) Place all ingredients into a bowl and rub together using your fingertips until it forms into dough.
2) Be careful not to over work the dough, but form it into a ball and cover with film. Place in fridge for 30 mins.
Filling: Preheat oven to 200 degrees celsius
1) Place the chopped pumpkin in a steam dish and then place over boiling water. The pumpkin should be steamed until a knife glides through and pumpkin is soft. Approx. 15 minutes.
2) Depending on how dry your pumpkin is, pour out the water from the pot leaving some behind. Transfer the cooked pumpkin to the pot and set aside.
3) In a small saucepan, pour in the olive oil and heat on very low. Add the shallots, garlic and thyme and cook until fragrant and until the shallots are soft. You don't want the garlic to burn. Once cooked, remove from pan.
4) Add the shallot mixture, cinnamon, nutmeg, butter and sugar to the pumpkin. Mash together and add salt and pepper to taste.
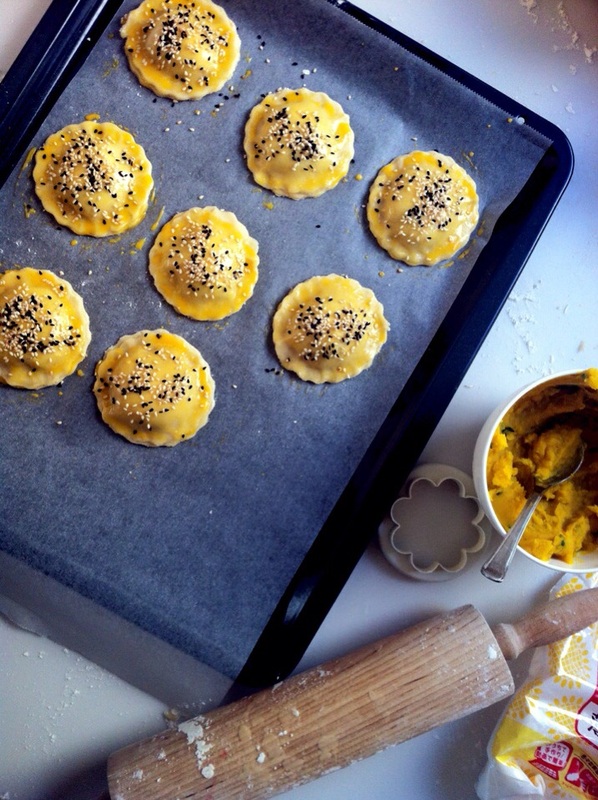
5) Prepare two trays with baking paper.
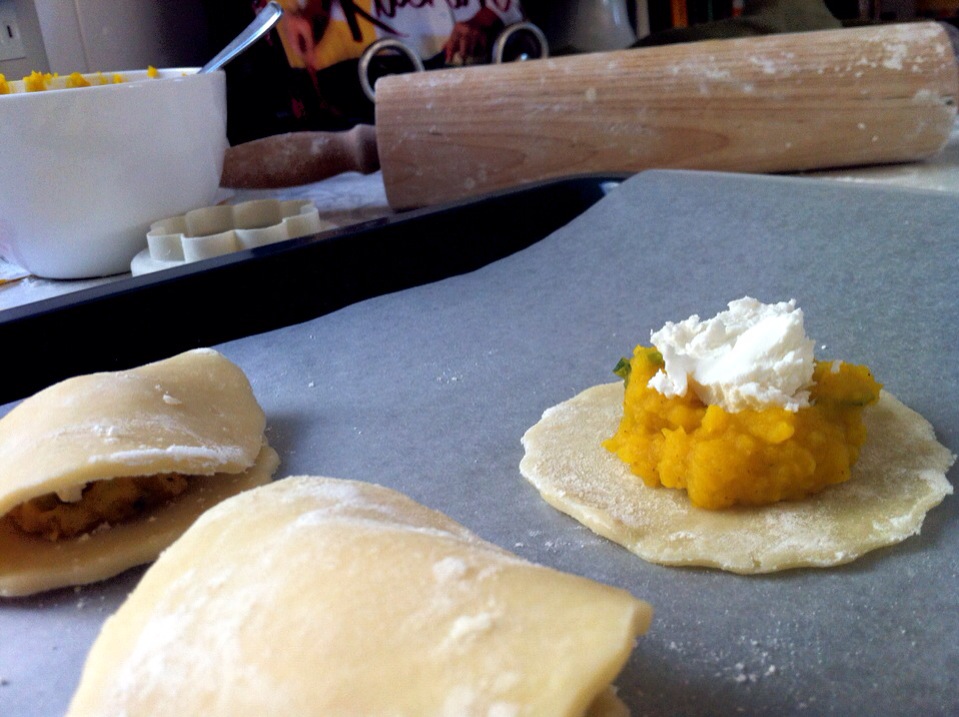
6) Roll out your dough on a flat surface dusted with flour to about a 1/4 of an inch in thickness. Using a cookie cutter, about 2 1/2 inch in diameter, cut out circles of dough.
7) Place circles on tray and assemble each pie by placing 1 tbsp of pumpkin mixture and 1 tsp of goats cheese, and top that with another circle. Press down the edges to seal them.
8) Beat an egg and using a brush, coat the tops of each pie and then sprinkle on desired amount of sesame seeds.
9) Place in oven and bake for 20 minutes, or until tops have become golden brown.
Enjoy with a salad or mustard coleslaw on the side. :)
MAKES ABOUT 15
|
| | Caera and I just ended with semester Exams so we haven't really been able to bake anything in a while. However, I made these before exams started for a Field Hockey team lunch (aka. a "bonding sesh"). I found this recipe while I was scrolling through pages and pages of food on Pinterest (my guilty pleasure) and decided these would be the perfect thing to bring. These apple pie bites were super easy to make and they did not take long to bake at all! I was so happy with the results so I decided to share them with you! So I hope you enjoy! P.S: Since I don't eat sugar (processed sugar)...I never got to try one, however I hear they tasted really good! PPS: I have also made a snapguide on how to make these! Be sure to check it out as well as my other guides! Apple Pie Bites Snap Guide |
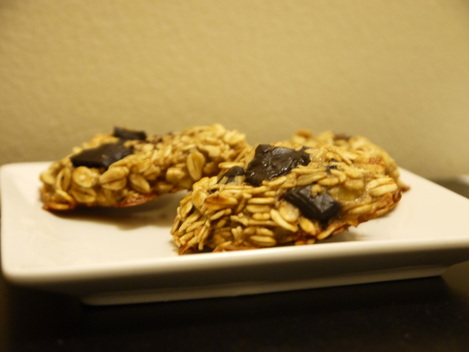 Hey! Its Hannah (: So I just got back from ski break today and I was really in the mood to bake something...that I can actually eat, something that was super quick and did not need a lot of ingredients. (: I saw this recipe on pinterest before and I decided to try it out and add my own twist on it! I mean come on, all this recipe requires is 2 bananas and 1 cup of quick oats!! Check out the original recipe here: The Burlap Bag First of all, if you are like me and thought that quick oats and regular oats were the same thing, here is a little oatmeal education for you..THEY ARE DIFFERENT. Trust me, I found out the-not-so-super-tasty-way. Now you can make these with normal oats (like I did) but they will come out a little chewier than if you make them with quick oats. Okay, so to start this recipe off...you need to find yourself 2 ripe bananas. I mean ripe, not yellow banans that are still edible, I'm talking about the neglected brownish bananas that are probably still sitting on your counter because you dont feel like throwing them away (Don't worry, I do the same thing) (: The second and final ingredient (for the basic cookie) is 1 cup of quick oats. Since I can't have dairy and I don't really eat a lot of sugar, I decided to throw in some 99% Cacao chocolate to give it more flavor. I'm warning you now, 99% Cacao chocolate is not the sweetest stuff in the world...It is really bitter so I suggest maybe throwing in some coconut, or normal chocolate chips if you want the sweet taste! Now that you have all your ingredients, the second to last step is to mash everything together to get it to a dough consistency. Then, place in the oven and bake for 15 min (: Ingredients: - 2 ripe bananas - 1 cup quick oats - Add-ins of your choice Directions: - Preheat oven to 350F - Combine the banana and quick oats and mash together. - Add in the other toppings/add-ins of your choice - Spoon onto GREASED (and yes, it must be greased) cookie sheet - Place in oven and bake for 15 min.
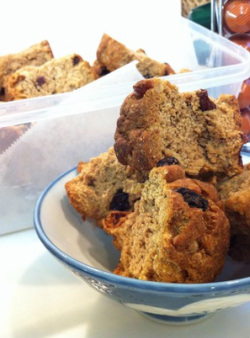
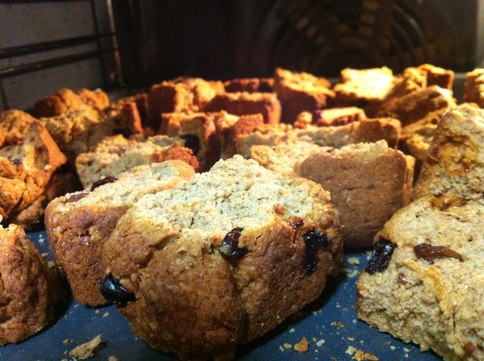
| | Howzit! (Just because "hello" feels too mainstream). The weather here in Japan right now is freaky cold and I can't feel my toes and fingers. Not cool. But, these days in particular call for a nice warm mug of tea, coffee or hot chocolate (depending on my mood), right by the fire. Oh yah, this pair is not complete until there's something to eat! These lovelies are kind of a cross between a biscotti and a cookie, and are the best thing for dunking! I grew up in South Africa eating rusks every day with a cup of tea, dunking away and savoring the awesome taste. It totally relates to cookies and milk. I reckon these are better....
You can eat these dry, too. They're just as tasty and are great for snacks on the go.
| Ingredients:
- 500 g wholewheat flour
- 1 cup white flour
- 1/2 cup sugar
- 1/2 tsp salt
- 1 tsp baking powder
- 1/2 tsp bicarbonate soda
- 1/2 teaspoon cream of tartar
- 1/2 cup butter, melted
- 1/2 cup seedless raisins
- 1/3 cup chopped pecans/walnuts
- 1 cup buttermilk (you can find powder that simply needs to be mixed with water)
- 1 egg
- 1/2 cup flavourless oil (vegetable, sunflower...)
Directions:
1) Preheat oven to 180 degrees celsius and line the bases of two 23x8x8 loaf tins with baking paper, and oil the sides.
2) In a large bowl, mix together all ingredients listed before melted butter. Then rub in the butter using your fingertips.
3) Add raisins and nuts to the mixture and combine.
4) In a separate bowl, whisk together the buttermilk, eggs and oil, and then add this to the dry mixture and combine well.
5) Knead the combined ingredients into a dough and roll into balls a little larger in size than a golf ball.
6) Pack the dough balls closely together into tins.
7) Bake for 1 hour. Then, turn out the rusks, break apart, and cut each ball in half. Try not to slice but rather cut a nick and break in half instead.
8) Arrange the rusks on flat baking sheets and dry out in a very low oven of 120-140 degrees celsius. This toasting gives them a great taste.
Makes about 36 rusks.
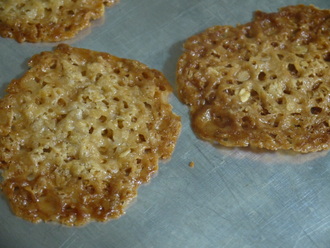
Ingredients: - 2/3 cup sugar
- 1/2 cup (1 stick ) unsalted butter
- 1/3 cup light corn syrup
- 1 1/4 cup rolled oats
- 1 cup flour
- pinch of salt
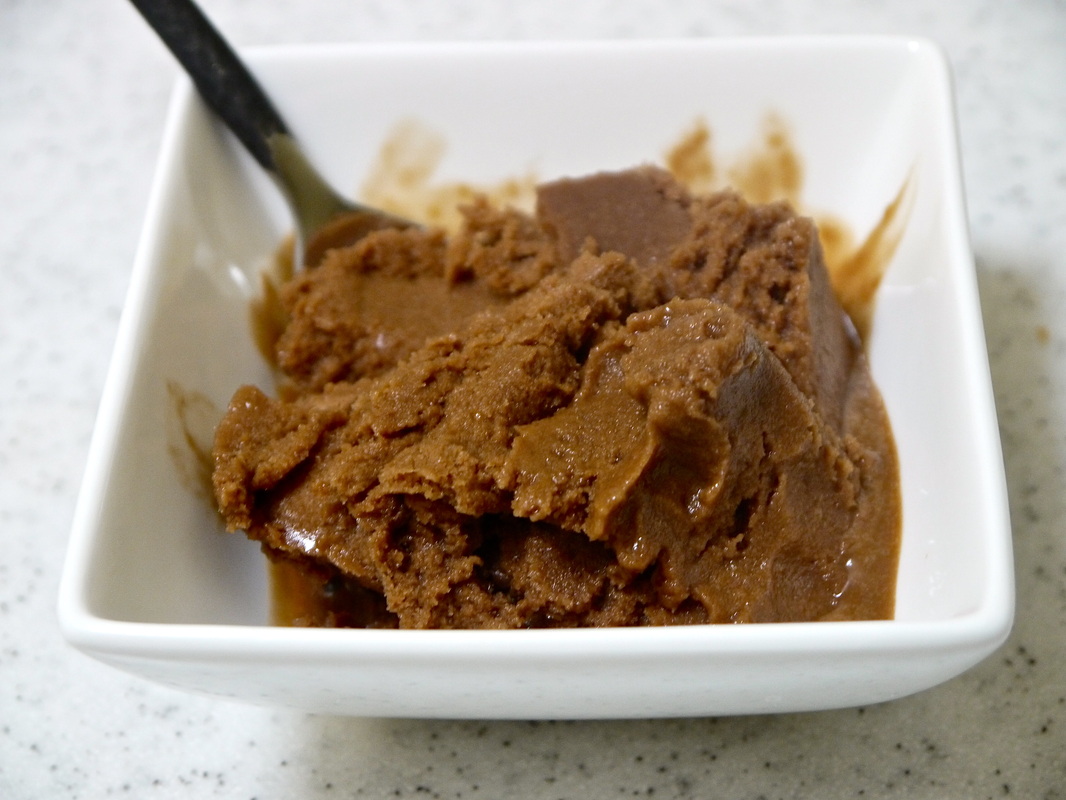
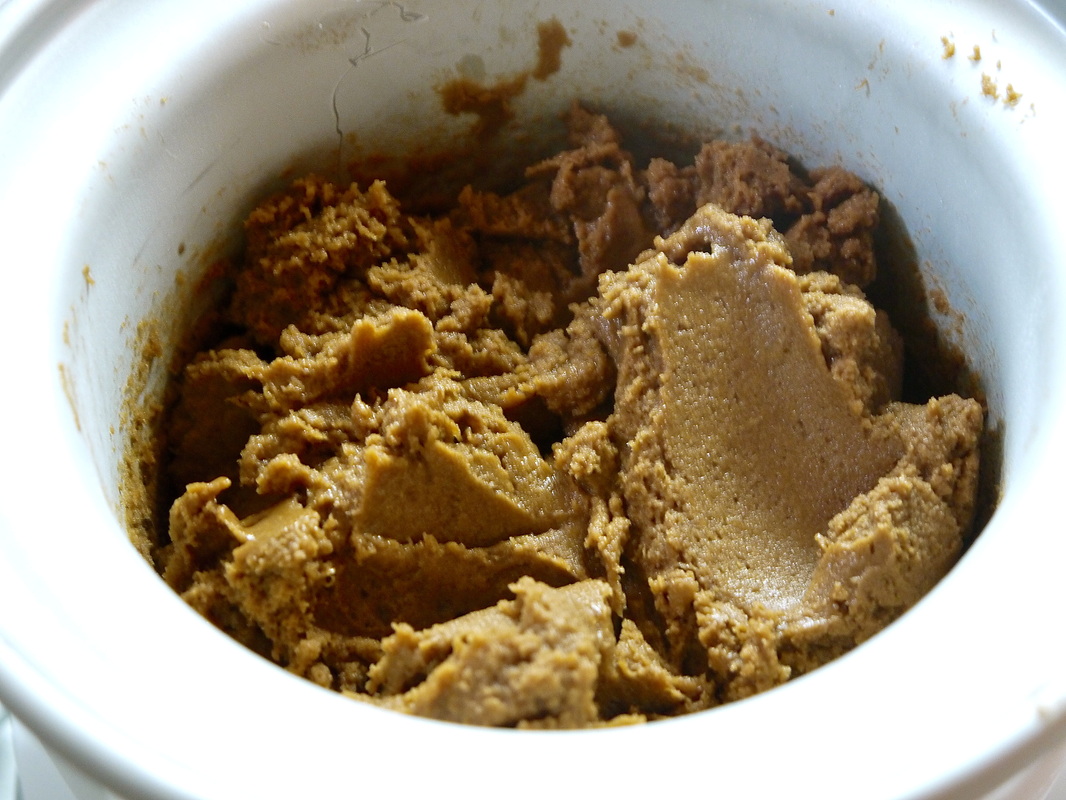
| So today my friend and I decided to bake something completely random. We chose this recipe from the cookbook Sticky, Chewy, Messy, Gooey by Jill O'Connor because we had no idea what florentines were and thought it sounded interesting. Our baking journey began with a mistake--i added too much butter to the pan. We had to remove some of the excess butter but I dont think we took enough out because in the end these florentines turned out to be super buttery ): Anyways, check out the recipe and try it! I recommend using less butter.
Because I cant really eat what we made, I had him tell me what they tasted like/reminded him of and he said rice krispy treats...so if you decide to make this recipe, email us and tell us what they tasted like!
| Directions: - In a saucepan over medium heat, add the sugar, butter and corn syrup. Make sure you are constantly stirring the mixture or else it will burn on the bottom.
- Once the mixture is completely smooth and combined remove from the heat and add the oatmeal, flour and salt. Keep stirring!
- Take the mixture out of the saucepan and place into a bowl, cover with saran wrap (or any material) and store in the refrigerator for an hour (minimum)
- Preheat oven to 325F
- After the refrigeration period is over, roll a small amount of dough (around a tablespoon) in between your palms to create a ball. Then place on a cookie sheet and bake for 15 minutes or until golden brown.
- Remove from the oven after the florentines are golden and allow time to cool, then ENJOY!
|


 RSS Feed